5. Using CRM
Microsoft has done wonders creating a desktop style user interface within a browser environment (although it is Internet Explorer only).
The top right of the page indicates the currently logged on user details with the left hand navigation pane allowing navigation to the different areas of the application:
· Workplace accesses individual activities and the personal queues and calendar as well as accounts (companies) and contacts.
· Sales shows the leads and the full sales cycle including customers, opportunities, quotations, orders, and invoices.
· Marketing allows the planning, creation, and monitoring of marketing campaigns and associated campaign response information.
· Service allows the creation of service contracts and the monitoring of progress on customer service cases.
· Settings allows access to the customisation features of CRM.
· Resources covers links to the CRM internet community moderated by Microsoft.
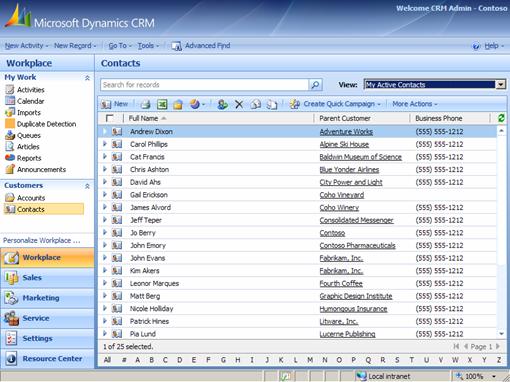
Selecting the workplace-contacts area provides an example of a view of a CRM entity. The selected view shows the appropriate list of contacts (in this case active contacts owned by the currently logged on user).
We use this chapter to introduce many of the usability aspects of CRM:
· The application toolbar buttons across the top of the page above the title access general functions such as adding new activities and records.
· The navigation pane on the left hand side accesses the different work areas available to the user.
· The view selection dropdown allows you to filter the records displayed in the list.
· The view toolbar controls functionality that applies to the selected records including reports, exporting to excel or word, assigning ownership, and actions specific to the entity.
· The alphabet bar and the page navigation buttons along the bottom of the view aid navigation.
5.1. Views
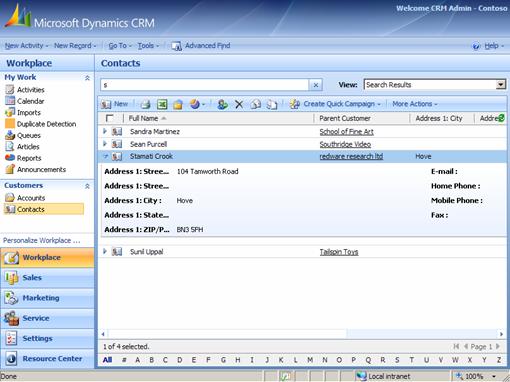
Searching for a contact involves selecting the appropriate view from the combo box at the top right of the window or searching for a value by typing the search text in the textbox at the top of the list and pressing the adjacent icon.
Note: The * character can be used as a wildcard to allow a search for text contained within a field instead of searching on the start of the field.
The columns displayed in a view can be sorted by clicking on the arrow just to the right of the field name and the column resized by dragging the column divider. Select a single record by clicking on the item or individual multiple records with control+click. You can select all the records in the current list by clicking the select all checkbox at the top left of the column headings.
Just above the column headings is the view toolbar which accesses functions that may be applied to the currently selected records in the view. These include:
· New. Create a new entity occurrence.
· Print. Print a default listing.
· Export to Excel. Export to a standalone Excel spreadsheet or dynamic pivot table or spreadsheet (dynamic spreadsheets will update with the latest data). This option also allows data to be exported and modified and the changes re-imported.
· Mail Merge. Mail merge to Word.
· Reports. Run the appropriate reports.
· Assign. Assign to another user (you can share from the more actions menu).
· Delete. Delete the currently selected records (you can deactivate records from the more actions menu instead of deleting).
· Send Direct Email. Sends an email from a template directly without requiring you to edit the message.
· Merge. Merge allows you to combine two records if one is a duplicate of the other. The master record inherits all of the activities of the subordinate record which is deactivated.
· Create Quick Campaign. Create activities quickly for the selected records (available only on accounts, leads and companies).
· Run Workflow. Runs workflow rules to perform required actions (this appears only if there is workflow defined against the entity).
· More Actions. See below.
The More Actions button accesses general functions that can be applied to the currently selected records in the view. The functions include:
· Edit. Brings up a blank form to allow you to set values on all the selected records (the option for editing multiple records might be denied depending on your security settings).
· Sharing. Share the record with other users or members of a team.
· Activate. Records can be activated and deactivated rather than deleted.
· Deactivate. Use this instead of delete to keep a history.
· Detect Duplicates. See the data management section.
· Copy Shortcut. Copies a URL of the current form to the clipboard (you can also use control+n to reveal the URL in the browser).
· Send Shortcut. Email the URL of the current form to a colleague.
· Add to Marketing List. Add record(s) to a marketing list (only for selected entities).
· Add Relationship. Define a relationship with another record for contacts, accounts, and opportunities.
The see more triangle at the left of each record can be toggled to view more information before selecting the record, and the letters at the bottom of the window provide an alphabet bar to select records in accordance with the sort column. Note also the page navigation button at the bottom right of the window.
Double clicking on the record in the view listing will open a new window containing the appropriate form for the record which allows changes to be made to the data and additional functionality to be accessed. Related entities are represented on a view as a column containing the primary attribute of the related entity as a hyperlink. Clicking on this navigation link will open the form for the related entity rather than the view entity (causing some confusion to novice users).
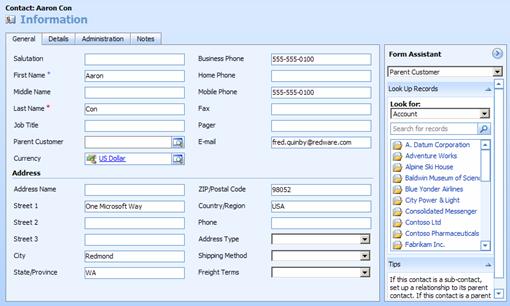
5.2. Forms
Each entity has a single form which pops up in a standalone web page (you need to disable the popup blocker in your browser). A navigation pane on the left hand side of each form allows access to related entities.
The fields containing data for the relevant entity are shown with a series of tabs across the top to allow additional areas of the form to be viewed (the arrangement of fields over these tabs is easily customised).
The Notes tab is interesting as this allows date-stamped notes to be recorded and documents to be loaded against the entity by pressing the paperclip icon in the form toolbar.
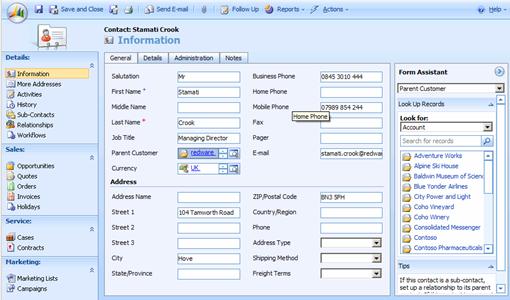
The form has a selection of buttons along the top to save and close the window along with additional buttons which may be specific to the entity or your CRM installation. Pay attention to the Actions button which accesses functionality specific to the entity.
Some of the more common buttons in the form toolbar include:
· Save to save the current record but keep the window open so that you can then select one of the related entities.
· Save and Close.
· Save and New to save the current record and create a new blank record.
· Delete.
· Follow Up to quickly create a related activity using the form assistant.
· Send Email. Brings up an email form to create and send a custom email.
· Reports.
· Attach a File. The paper clip is used to attach a file into the notes section of the form.
· Run Workflow. See the workflow section.
· Assign to change the owner of the record to another user (or queue) or assign it to yourself.
· Actions to add a new activity or perform workflow or access functionality specific to the entity.
You can easily change data by overwriting the current value in the field remembering to press the save button after you have finished editing the record. Sometimes a record is read-only and you can view but cannot edit it as the fields are all greyed out (security is determined by the owner of the record).
Notice the lookup window that appears when clicking on the lookup button to the right of a field for a related entity. CRM also has auto-response which is an intelligent way of entering data into fields which require you to select a record from a related entity. You can simply enter the required text directly in the field and tab out of the field leaving CRM to search for the best match for you.
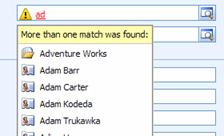
Use semi-colons in the auto-response field to select multiple values where appropriate. You will see an exclamation mark if there is more than one possible value and you can then click on the exclamation mark (or the lookup button) to see a list for a partial search based upon the characters already typed.
Note the Form Assistant button to the right of the data entry area which you can expand to show a helper area. The available options are shown in a combo box at the top of the form assistant and are selected as you enter the corresponding field in the data entry area. The form assistant displays a lookup of the appropriate records so you can make a quick selection without popping up the lookup window.
5.3. Notes and Attachments
Most entities have a notes and attachments area which allows a time-stamped comment to be entered by a user:
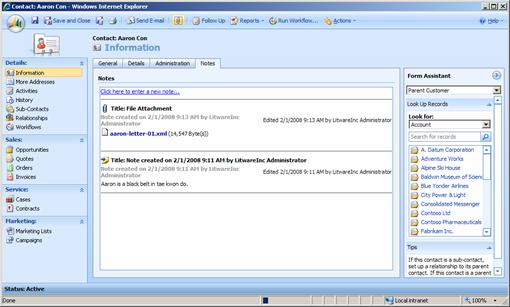
Attachments are added with the paperclip (or from the actions menu) and prompt for you to attach the file by selecting a file from your local hard drives. The document is stored in the CRM database and is made available to all users.
5.4. Advanced Find
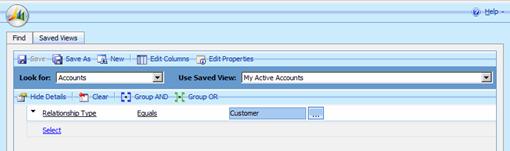
The Advanced Find option on the View page can be used to configure selection criteria to filter data as required. The following screenshot shows how to set up a View on Accounts for relationship type customers only.
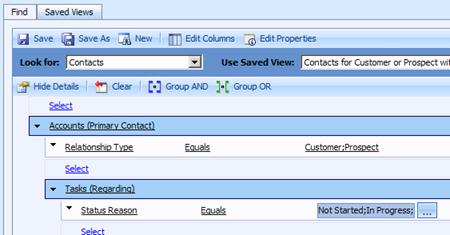
Selection criteria can bring in fields from related entities. The following example filters Contacts for prospects or customers with incomplete Task activities. In this example, the (many-to-one) relationship to the primary account is used to check the relationship category, and the (one-to-many) relationship to Tasks is used to check for the presence of incomplete tasks.
You can save a view and it will appear in the drop down list for the appropriate entity (you may need to refresh your browser) and you can also select the saved view and share it with other users or teams. The system customiser can create views for all to see using a very similar interface.
You can also edit the columns shown in a view and change the width and order of the columns as well as selecting which column is the default sort order. Designing a view with the required fields in combination with the export to Excel functionality provides a handy way for performing regular reporting or data export procedures.
You can select fields from related entities in a View (they must be in a many to one relationship so there is a maximum of one corresponding record in the related table). You can select any field but you are limited to the primary attribute if you want two degrees of separation to relate records from an entity related to the related entity.
5.5. Exporting CRM data to Excel
All Views can easily export data to Excel (subject to the security settings) and a custom view can be created to contain any fields from related (many-to-one) entities.
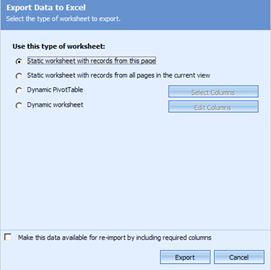
Select the Export to Excel button from the View Toolbar (control-click to make a selection of records if required) and then choose from the following options:
· Static Worksheet. Simply exports the current view to Excel.
· Dynamic Pivot Table. Allows you to make a selection of columns (so you do not have to create a view with all required fields) and export to a dynamic pivot table.
· Dynamic Worksheet. Allows you to select the columns required and export to a dynamic Excel file.
Note: Dynamic Excel files extract data from the database each time they are refreshed. The CRM database will use the Windows security of the currently logged on user so that the data returned may be different for each user.
A very useful feature here is the ability to tick the checkbox to Make the data available for re-importing. This adds some fields required to track the origin of the data and allows you to email the spreadsheet to a colleague or external contact for updating. You can then re-import the data using the tools-import data option, whereupon the changed fields will be updated and new records inserted.
Note: This is perhaps the single most important feature to allow non-programmers to integrate CRM with external systems. It works with custom entities and allows you to both modify and add records.
5.6. Mail Merge to Word
The view toolbar has a mail merge button available on some entities to help create a quick mail merge file to control Microsoft Word (2003 or 2007). Select the required fields by selecting the appropriate view and selecting all records or using control+click before pressing the mail merge button.
The mail merge wizard appears and you may specify a letter, fax, email or label merge type and optionally choose an existing Word template document stored in CRM.
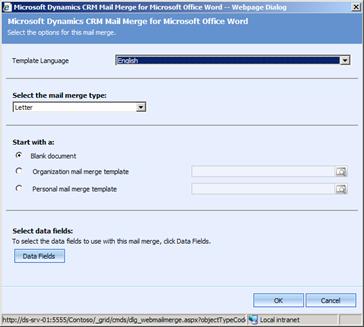
CRM defaults the list of fields exported to Word but allows you to select the fields you require from the appropriate entity together with access to related (many-to-one) entities if required.
The mail merge process will open a Word document on your machine, and you may need to select the Add Ins menu at the top of the window and click on the CRM Mail Merge macro and enable macros on your copy of Word when prompted.
You can perform the mail merge as usual within Word by adding the address block and greeting block and creating the merged Word document. Word also allows you to create envelopes, labels, directory type listings and email messages in addition to letter mail merge.
Note: If you use this option from the Outlook Client you will also be prompted if you would like to create the corresponding activity records in CRM (although the letter will not be attached).
An alternative to mail merge is to use the export to Excel option and add the appropriate fields to create a mail merge file that could be used with any word processing package (or sent to an external fulfilment house).
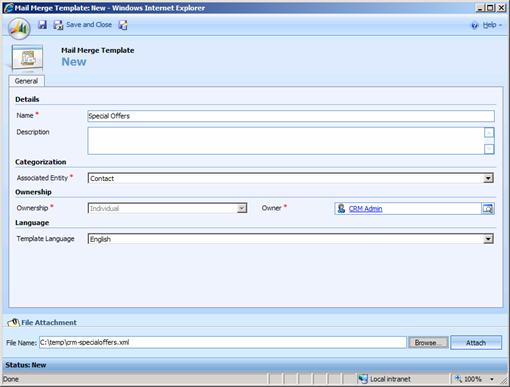
5.7. Word Templates
Word Templates are added to the system from the settings-templates-mail merge templates form and can be uploaded from your hard drive.
5.8. Email
The lead, contact and account forms have a Send Email button on the toolbar which creates a new email activity. Emails can also be created in a similar manner to other activities using the new activity button on the CRM toolbar.
Emails are sent out from the CRM web interface using either SMTP or Exchange (the former are not automatically copied into the Outlook folders). Emails can be typed with simple formatting or created from an email template or knowledge base article (described in the Services chapter).
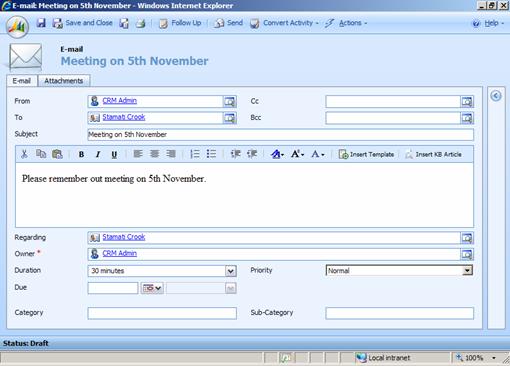
Note: When entering text into an email message, use enter for a paragraph line space but use shift+enter if you want a line break only with no space.
5.9. Email Templates
Email Templates can be configured system-wide or by each user as a quick productivity aid. Personal Email Templates are created from tools-options or the workplace-personalize workspace option in CRM or the CRM-options menu in the Outlook client.
You may type text with simple formatting using the toolbar in the edit space or open an html page in Internet Explorer and select the contents to paste into the page for sophisticated layouts.
Be careful to design your HTML to use images that are available at an internet location as images are not stored or transmitted along with the email. Note also that some email clients block images and show only the plain HTML by default.
You can insert dynamic values from the database for the associated CRM entity data into the email. User field values are always available for you to design a signature showing, for example, the user name and telephone number. Select the Insert/Update button at the top of the page to insert the required data field with an optional value to show if the data field is blank. The entities available will depend on the base entity selected when you create the template.
Note: It does not seem possible to define attachments for a template which need to be added each time (or created using workflow).
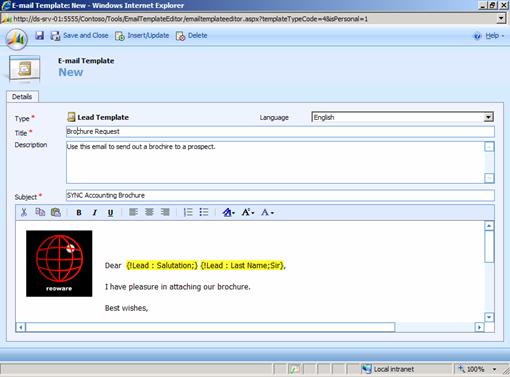
Specifying style information is difficult via the user interface because it is not possible to edit the html header information to define a style or add a style sheet. Consequently you must control the style information by using the formatting buttons or with inline styles.
The easy way to create sophisticated email templates is to create the web page with inline styles and save and open the file in Internet Explorer for pasting into the template. The inline styles will be preserved when you paste and the underlying HTML for an inline style looks like this:
<p style="font-family: Arial, Helvetica, sans-serif; font-size: 12px">Thank you for taking the time to talk with me about our software add-ons for Microsoft CRM 3.0. We currently offer the following functionality: </p>
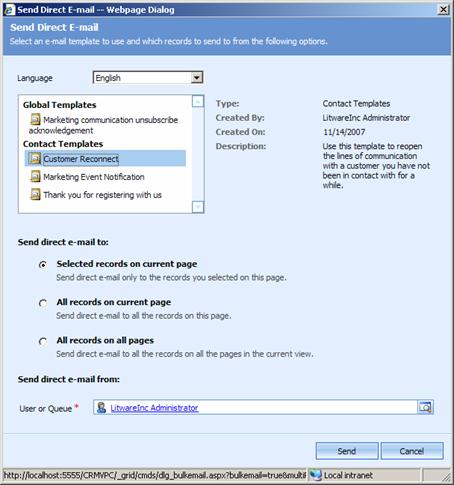
5.10 Send Direct Email
The Send Direct E-mail button is available on the toolbar of some views and allows you to send a template email straight off to one or more contacts without needing to view or edit the emails. Select the required view and control+click to select the required records and then press the Send Direct E-mails button, select the email template, and the emails are sent and automatically stored in the activity history.
5.11. Quick Campaigns
The Quick Campaign button on the view toolbar allows activities to be created for each record selected. This might be useful to schedule outbound phone calls or to create emails or activities quickly without using a marketing list or proper campaign (see the Marketing section for more details).
Selecting the Quick Campaign button prompts you to choose an activity type and then displays a template form for you to set the values required into the generated activities. You can use dynamic field values to enter details from the corresponding records.
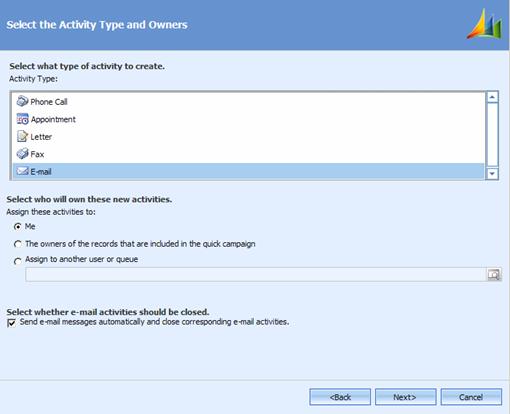
Note: The checkbox at the bottom of the quick campaign allows you to send out the generated emails immediately.
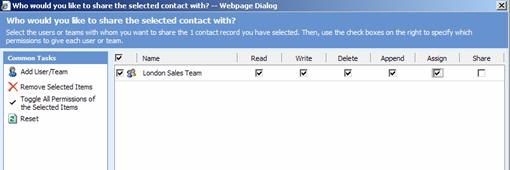
5.12. Sharing and Assignment
Security is set up according to the owner of each record (see the chapter on security). Each owner belongs to a business unit which determines the security settings and whether other users can read the data and write and perform other activities on the record.
CRM allows you to change the current owner of the entity occurrence using the assignment option from the actions-assign option which is available on the toolbar for most entities (if you have permissions). Changing the owner will change the security settings and you may no longer be able to view or edit the data in certain situations.
Note: Assigning is the same as changing the value of the owner field.
Sharing the entity occurrence with the actions-sharing option does not change or overwrite the security setting but allows other users or teams access to the entity occurrence.